Do it your self - instagram unfollower

If you spend a lot of time on instagram, and accounts you followed in the past seem irrelevant now, unfollow them makes the most sense. 

Even if you don’t care about having a tight “follower to following ratio,” this is useful because it helps to unclutter your feed, ensuring that the content you scroll through is all stuff you want to see.

Unfortunately, Instagram doesn’t make it easy to do. you can Unfollow all manually one by one, but it will takes a lot of times and i am sure you wont be happy to do it.

NOTE:

This tutor works on english version of Instagram layout because this script search "Following" button,

the extension may not work in the future if Instagram changes their layout, in this case, you should subscribe my channel to get an update for the new script.

my youtube channel :

Newbie Computer - YouTube


An easy way to do this is with the help of a chrome extension. here's a simple way to do it.

You only have to create 2 files, manifest.json and unfollow.js

1. manifest.json

copy the code below and paste it in to your manifest.json file:

{

 "manifest_version": 2,

 "name": "Instagram UnFollower - FreeAngel",

 "description": "This extension will unfollow all instagram accounts",

 "version": "1.0",

"content_scripts": [

 {

 "matches": ["https://*.instagram.com/*"],

 "js": ["unfollow.js"]

 }

 ]

}

This is just a metadata file in JSON format that contains properties like your extension’s name, description, version number and so on. Every extension needs to have a JSON-formatted manifest file.


2. unfollow.js

copy the code below and paste it in to your unfollow.js file:

/*

Simple script to unfollow all instagram account

(c) FreeAngel - 2021

http://www.youtube.com/channel/UC15iFd0nlfG_tEBrt6Qz1NQ

*/

const interval = 5000;

const wait_delay = 5;

const reload_after_unsub = 20;

instagram_following_page = '';


cur_tick = 0;

buttons = null;

btn_idx = 0;

no_subs = false;

infollowing_page = false;

inprofile_page = false;


   var readyStateCheckInterval = setInterval(function() {


   if (document.readyState === "complete") {


    cur_tick += interval/1000;

DoJob();

console.log("timer ...");


   }

}, interval);

function DoJob(){

if(cur_tick < wait_delay ) { console.log("waiting delay (10s) : "+cur_tick); return; }

if(no_subs) { 

if (cur_tick >= 30) { console.log("reloading page ..."); window.location = instagram_following_page; }

return; 

}


var cur_url = window.location.href;


if(cur_url.indexOf("instagram.com") == -1) { return; }


if(!IsInProfilePage()) { return; }


if(!infollowing_page){

if(cur_url.indexOf("following") != -1){

infollowing_page = true;

instagram_following_page = cur_url;

}

}

var b = IsDialogOpen();

if(!b) { 

OpenDialog();

return ; 

} else {

console.log("dialog is open");

}

var c = UnFollow();

if( c < 1) { no_subs = true; return; }

console.log("unfollow : "+c);

}


function IsInProfilePage(){

if(inprofile_page) { return true; }

var ar = document.getElementsByTagName('a');

var hr = '';

for(var i=0; i<ar.length; i++){

hr = ar[i].getAttribute('href');

if (hr.indexOf('accounts/edit/') != -1){

console.log("In Profile Page !");

inprofile_page = true;

return true;

}

}

return false;

}


function IsDialogOpen(){

var ar = document.querySelector('div[role="dialog"]');

if(ar){ return true; }

return false;

}


function OpenDialog(){

var ar = document.getElementsByTagName('a');

if(!ar) { return; }

var hr;

for(var i=0; i<ar.length; i++){

hr = ar[i].getAttribute("href");

if(!hr) { continue; }

if(hr.indexOf("/following/") == -1) { continue; }

ar[i].click();

console.log("opening dialog");

break;

}

}


function UnFollow(){

var ar = document.getElementsByTagName('button');

if(!ar) { return 0; }

var l;

var c = 0;

for(var i=0; i<ar.length; i++){

l = ar[i].textContent;

if(l.indexOf("Following") != -1){

ar[i].scrollIntoView();

ar[i].click();

c++;

setInterval(function(){

SubUnfollow();

},1000);

return c;

}

}

return c;

}


function SubUnfollow(){

var ar = document.getElementsByTagName('button');

if(!ar) { return; }

var l;

for(var i=0; i<ar.length; i++){

l= ar[i].textContent;

if(!l) { continue; }

if(l.indexOf("Unfollow") != -1){ ar[i].click(); return; }

}

}


put those two files into a directory, name the directory anything you want.

you can also download the complete files here :

https://drive.google.com/file/d/1r2Yc-ldrU5mR3RL6Cr5Ncg4BXBensvoQ/view?usp=sharing


CONNECT TO CHROME

Now we need to ..load the extension!

  1. Go to chrome://extensions in your browser
  2. Ensure that the Developer mode checkbox in the top right-hand 
  3. Click Load unpacked extension to pop up a file-selection dialog & select your directory.
  4. If the extension is valid, it’ll be loaded up and active right away! If it’s invalid, an error message will be displayed at the top of the page. Correct the error, and try again.
  5. Ensure that the enabled box next to your chrome extension is checked so you can see it in action.
  6. Now you can go to : https://www.instagam.com, make sure you've logged in, go to your profile page, reload the page if nothing happen.
  7. Just Wait until it started to work
the script will wait for 10 seconds every time page reloaded before execute with 5 seconds delay on every unfollow action.

*IMPORTANT: Make sure to click reload after every change you make so you can see it in action →

youtube video


How to unblock all blocked twitter account easily

If you spend a lot of time on twitter, and acounts you blocked in the past seem irrelevant now, unblocking them makes the most sense. Unfortunately, Twitter doesn’t make it easy to do. you can remove all your blocked account manually one by one, but it will takes a lot of times and i am sure you wont be happy to do it.

NOTE:

This tutor works on english version of twitter layout because this script search "Blocked" button,

the extension may not work in the future if twitter changes their layout, in this case, you should subscribe my channel to get an update for the new script.

my youtube channel :

https://www.youtube.com/channel/UCqRqvw9n7Lrh79x3dRDOkDg


An easy way to do this is with the help of a chrome extension. here's a simple way to do it.

You only have to create 2 files, manifest.json and unblock.js

1. manifest.json

copy the code below and paste it in to your manifest.json file:

{

 "manifest_version": 2,

 "name": "Twitter Unblocker - FreeAngel",

 "description": "This extension will unblock all blocked twitter accounts",

 "version": "1.0",

"content_scripts": [

 {

 "matches": ["https://twitter.com/*"],

 "js": ["unblock.js"]

 }

 ]

} 

This is just a metadata file in JSON format that contains properties like your extension’s name, description, version number and so on. Every extension needs to have a JSON-formatted manifest file.


2. unblock.js

copy the code below and paste it in to your unblock.js file:

/*

Simple script to unblock all twitter blocked account

(c) FreeAngel - 2021

https://www.youtube.com/channel/UCqRqvw9n7Lrh79x3dRDOkDg

*/

const interval = 5000;

const wait_delay = 10;

const reload_after_unsub = 20;

const twitter_blocked_page = 'https://twitter.com/settings/blocked/all';


cur_tick = 0;

buttons = null;

btn_idx = 0;

no_subs = false;


   var readyStateCheckInterval = setInterval(function() {


   if (document.readyState === "complete") {


    cur_tick += interval/1000;

DoJob();

console.log("timer ...");


   }

}, interval);

function DoJob(){

if(cur_tick < wait_delay ) { console.log("waiting delay (10s) : "+cur_tick); return; }

if(no_subs) { 

if (cur_tick >= 30) { console.log("reloading page ..."); window.location = twitter_blocked_page; }

return; 

}


var cur_url = window.location.href;

if(cur_url != twitter_blocked_page) { return; }

if(!buttons){

console.log("Get all unblock buttons");

buttons = document.querySelectorAll('[role="button"]');

console.log("Got Btn : "+buttons.length);

btn_idx = 0;

}


var btn;

var lbl;


if (!buttons.length) { console.log('There are no blocked account left ..'); no_subs = true; return; }

var i = 0;

for(i = 0; i < buttons.length; i++){

btn = buttons[i];

lbl = btn.getAttribute('aria-label');

if(lbl == null) { continue; }

if(lbl.indexOf("Blocked") == -1) { continue; }

console.log(lbl);

btn_idx += 1;

btn.click();

break;

}


if (btn_idx < 1) { console.log('There are button found ..'); no_subs = true; return; }

if ((btn_idx >= reload_after_unsub) || (i >= buttons.length-1)) {

window.location = twitter_blocked_page;

return;

}


}

put those two files into a directory, name the directory anything you want.

you can also download the complete files here :

https://drive.google.com/file/d/1vj6Tv2ToW_o7iltFNjQl32xeG2vxKt7a/view?usp=sharing


CONNECT TO CHROME

Now we need to ..load the extension!

  1. Go to chrome://extensions in your browser
  2. Ensure that the Developer mode checkbox in the top right-hand 
  3. Click Load unpacked extension to pop up a file-selection dialog & select your directory.
  4. If the extension is valid, it’ll be loaded up and active right away! If it’s invalid, an error message will be displayed at the top of the page. Correct the error, and try again.
  5. Ensure that the enabled box next to your chrome extension is checked so you can see it in action.
  6. Now you can go to : https://twitter.com/settings/blocked/all, make sure you've logged in, reload the page if nothing happen.
  7. Just Wait until it started to work
the script will wait for 10 seconds every time page reloaded before execute with 5 seconds delay on every unmute action.

every 20 unblocked account, the script will try to reload the page, you can change the value for "const reload_after_unsub" with any value you want.

*IMPORTANT: Make sure to click reload after every change you make so you can see it in action →

youtube video


how to mass unmute twitter accounts easily

If you spend a lot of time on twitter, and acounts you muted in the past seem irrelevant now, unmuting them makes the most sense. Unfortunately, Twitter doesn’t make it easy to do. you can remove all your muted account manually one by one, but it will takes a lot of times and i am sure you wont be happy to do it.

NOTE:

This tutor works on english version of twitter layout because this script search "Unmute ...." button

An easy way to do this is with the help of a chrome extension. here's a simple way to do it.

You only have to create 2 files, manifest.json and unmute.js

1. manifest.json

copy the code below and paste it in to your manifest.json file:

{

 "manifest_version": 2,

 "name": "Twitter Unmute  - FreeAngel",

 "description": "This extension will unmute all muted twitter account",

 "version": "1.0",

"content_scripts": [

 {

 "matches": ["https://twitter.com/*"],

 "js": ["unmute.js"]

 }

 ]

}


This is just a metadata file in JSON format that contains properties like your extension’s name, description, version number and so on. Every extension needs to have a JSON-formatted manifest file.


2. unmute.js

copy the code below and paste it in to your unmute.js file:

/*

(c) FreeAngel - 2021

https://www.youtube.com/channel/UCqRqvw9n7Lrh79x3dRDOkDg

*/

const interval = 5000;

const wait_delay = 10;

const reload_after_unsub = 20;

const twitter_muted_page = 'https://twitter.com/settings/muted/all';


cur_tick = 0;

buttons = null;

btn_idx = 0;

no_subs = false;


   var readyStateCheckInterval = setInterval(function() {


   if (document.readyState === "complete") {


    cur_tick += interval/1000;

DoJob();

console.log("timer ...");


   }

}, interval);

function DoJob(){

if(cur_tick < wait_delay ) { console.log("waiting delay (15s) : "+cur_tick); return; }

if(no_subs) { 

if (cur_tick >= 30) { console.log("reloading page ..."); window.location = twitter_muted_page; }

return; 

}

var cur_url = window.location.href;

if(cur_url != twitter_muted_page) { return; }

if(!buttons){

console.log("Get all unmute buttons");

buttons = document.querySelectorAll('[role="button"]');

console.log("Got Btn : "+buttons.length);

btn_idx = 0;

}


var btn;

var lbl;


if (!buttons.length) { console.log('There are no muted account left ..'); no_subs = true; return; }

var i = 0;

for(i = 0; i < buttons.length; i++){

btn = buttons[i];

lbl = btn.getAttribute('aria-label');

if(lbl == null) { continue; }

if(lbl.indexOf("Unmute") == -1) { continue; }

console.log(lbl);

btn_idx += 1;

btn.click();

break;

}


if (btn_idx < 1) { console.log('There are no unmute button found ..'); no_subs = true; return; }

if ((btn_idx >= reload_after_unsub) || (i >= buttons.length-1)) {

window.location = twitter_muted_page;

return;

}


}


put those two files into a directory, name the directory anything you want.

you can also download the complete files here :

https://drive.google.com/file/d/1sl2EAfBWckiMWyBS6G0p6mdATH_s1Zxp/view?usp=sharing


CONNECT TO CHROME

Now we need to ..load the extension!

  1. Go to chrome://extensions in your browser
  2. Ensure that the Developer mode checkbox in the top right-hand 
  3. Click Load unpacked extension to pop up a file-selection dialog & select your directory.
  4. If the extension is valid, it’ll be loaded up and active right away! If it’s invalid, an error message will be displayed at the top of the page. Correct the error, and try again.
  5. Ensure that the enabled box next to your chrome extension is checked so you can see it in action.
  6. Now you can go to : https://twitter.com/settings/muted/all, make sure you've logged in, reload the page if nothing happen.
  7. Just Wait until it started to work
the script will wait for 10 seconds every time page reloaded before execute with 5 seconds delay on every unmute action.

every 20 unmutes, the script will try to reload the page, you can change the value for "const reload_after_unsub" with any value you want.

*IMPORTANT: Make sure to click reload after every change you make so you can see it in action →

Youtube video


How to mass unsubscribe youtube account easily

If you subscribe to YouTube accounts too much, you may be annoyed by too many notifications. and if you want to delete them you will be too tired to unsubscribe them one by one.

An easy way to do this is with the help of a chrome extension. here's a simple way to do it.


*** script updated at 21/06/21

Create A File Called manifest.json

This is just a metadata file in JSON format that contains properties like your extension’s name, description, version number and so on. Every extension needs to have a JSON-formatted manifest file.


**copy the code below and paste it in to your manifest.json file:

{

 "manifest_version": 2,

 "name": "Youtube Unsubcriber - FreeAngel",

 "description": "This extension will do mass unsubscribe for your account ",

 "version": "1.0",

"content_scripts": [

 {

 "matches": ["https://www.youtube.com/*"],

 "js": ["youtube.js"]

 }

 ]

}


 Create A File Called youtube.js

**copy the code below and paste it in to your youtube.js file:


/*


(c) FreeAngel - 2021


https://www.youtube.com/channel/UCqRqvw9n7Lrh79x3dRDOkDg


*/


const interval = 5000;

const wait_delay = 10;

const reload_after_unsub = 15;

cur_tick = 0;

buttons = null;

btn_idx = 0;

no_subs = false;


   var readyStateCheckInterval = setInterval(function() {

   if (document.readyState === "complete") {

    cur_tick += interval/1000;

DoJob();

console.log("timer ...");

   }

}, interval);


function DoJob(){


if(cur_tick < wait_delay ) { console.log("waiting delay (15s) : "+cur_tick); return; }


if(no_subs) { 

if (cur_tick >= 30) { console.log("reloading page ..."); window.location = "https://www.youtube.com/feed/channels"; }

return; 

}

var cur_url = window.location.href;

if(cur_url.indexOf("youtube.com/feed/channels") == -1){ return; }

if(!buttons){

console.log("Get all unsub buttons");

buttons = document.querySelectorAll('.ytd-subscribe-button-renderer');

console.log("Got Btn : "+buttons.length);

btn_idx = 0;

}


if (!buttons.length) {

console.log('There are no subscriptions on your channel.');

no_subs = true;

return;

}


if ((btn_idx >= buttons.length-1) || (btn_idx >= reload_after_unsub)){

window.location = "https://www.youtube.com/feed/channels";

return;

}


var found = false;

for(var i=0; i<buttons.length; i++){

  var al = buttons[i].getAttribute('aria-label');

  if((al) && (al.indexOf('Unsubscribe from') != -1)) {

  buttons[i].scrollIntoView();

  buttons[i].click();

  setTimeout(function() {

const button = document.getElementById('confirm-button');

if (button) { button.click(); }

}, 100);

  btn_idx++;

  found = true;

  break;

}

}

if(!found){

console.log('There are no subscriptions on your channel.');

no_subs = true;

}

}


put the two files in a directory, you can name the directory anything you want.

Or You can download it from here :

https://drive.google.com/file/d/1ky4SYMIbeYnqM-ooFLOTvuUkAWWB3kLn/view?usp=sharing

CONNECT TO CHROME

Now we need to ..load the extension!

*IMPORTANT: Make sure to click reload after every change you make so you can see it in action →

How to automatically redirect Blogger blog to another blog or website

You can redirect your specific post URL to another post or page, all 301 or 302 redirection within your blog. 

That will be useful for redirecting 404 error pages and broken links; however with that you cannot redirect homepage to any particular URL. Here we will show you how to automatically redirect Blogger blog to another blog or website or any URL. So with this technique you can redirect your Blogger Homepage or any particular page to external websites.

This will be useful if you have just migrated to new domain with new blogging platform. Usually you won’t get much traffic to your new blog when you just shifted. Also your old blog will have some decent traffic flow from organic search results as well as from backlinks. So by using this method you can drive traffic from your old blog to your new blog and also it passes all the ranking factors.


Redirect Page To Page 

- go to settings::Errors and redirects::Custom redirects

- click Custom Redirect and add page that you want to redirect

Note:

There is a permanent option below the To URL, you can check the permanent option to setup 301 redirection on Blogger, leave it unchecked to create 302 redirection on Blogger.

Do not enter the full URL in the From or To field. Just omit the main domain name in the full URL and enter sub directory name and file name, such as /2021/02/redirect-blog-URL.html. Also you can not redirect Blogger URL or post to external links.


Using JavaScript

  1. Login to your Blogger dashboard
  2. Go to template and click edit HTML
  3. Now you can see template codes. Press CTRL + f and then find <head>
  4. Now add the following code between <head> and </head>
<script>
window.location="http://www.yourdomain.com";
</script>

dont forget to replace the red text with your domain.

this method will redirect the whole pages to yourdomain.com


Redirect with custom filter

You can filter which page that will be redirect to your domain.

<script>

var s = window.location.href;

if(s.indexOf("windows") != -1)

    window.location = "http://www.yourdomain.com/windows.html";

</script>

 this method will redirect all pages with url : "http(s)://*windows%" to yourdomain.com/windows.html


Redirect Page With Parameter

You can redirect to another domain with the same page and parameter. 

<script>

  var s = window.location.pathname;

  var ar = s.split('/');

  s = 'http://www.yourdomain.com/'+ar[ar.length-1];

  window.location = s+window.location.search;

</script> 

This method will redirect all pages to another domain with the same parameter.

eg: https://frxangelz.blogspot.com/2021-01-01/test.html?act=what 

will be redirected to

http://www.yourdomain.com/test.html?act=what

note: the path is not included, only the page(html) with it's parameter.

youtube video


Random post with specific label - Blogger Widget

If you are looking for a random post widget for blogger then you are right place. This is an example how to add random post widget with specific label.

1. go to blogger dashboard, select template and edit html.


2. search for </head> to add script.
- you may download and upload to your site, or just use this link (no download required)
script
<script src='http://docs.google.com/uc?id=0B7xJbTAja8i0a0ZJbXJ2TkkwSW8&amp;export=download' type='text/javascript'/>


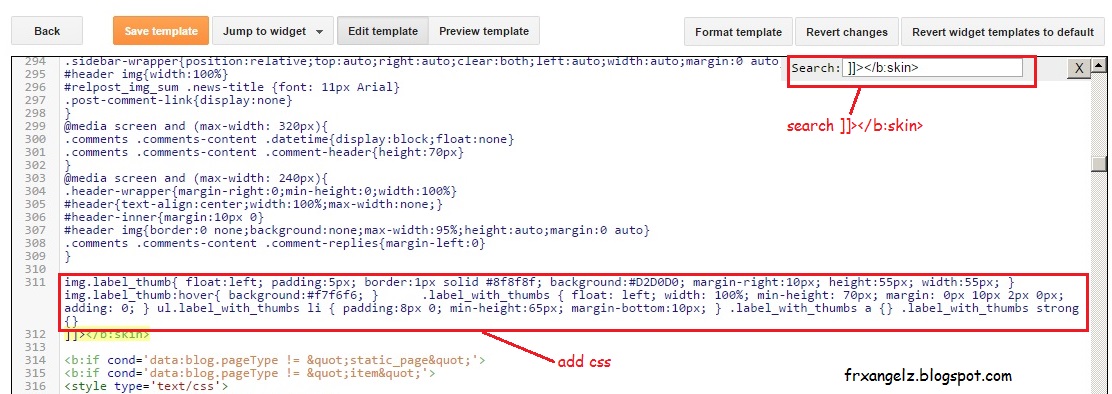
2. search for ]]></b:skin> to add style/css.
img.label_thumb{ float:left; padding:5px; border:1px solid #8f8f8f; background:#D2D0D0; margin-right:10px; height:55px; width:55px; } img.label_thumb:hover{ background:#f7f6f6; } .label_with_thumbs { float: left; width: 100%; min-height: 70px; margin: 0px 10px 2px 0px; adding: 0; } ul.label_with_thumbs li { padding:8px 0; min-height:65px; margin-bottom:10px; } .label_with_thumbs a {} .label_with_thumbs strong {}

2. save template.

3. add a widget.

3. edit widget. at this example i use random post with label "blogger", you must replace it with your label.
<div style="overflow:hidden; width:100%px; height:auto; padding:10px; border:1px dotted #ddd; background-color:#fff"><script type='text/javascript'>var numposts = 4;var showpostthumbnails = true;var displaymore = false;var displayseparator = false;var showcommentnum = false;var showpostdate = false;var showpostsummary = true;var numchars = 50;</script><script type="text/javascript" src="http://frxangelz.blogspot.com/feeds/posts/default/-/blogger?orderby=updated&alt=json-in-script&callback=rpost_thumbs"></script></div>


4. save.

watch video tutorial :

How to Make Any Blogger Widget/Gadget/web element Sticky (float)

Sticky widgets are widgets/gadgets in a webpage which sticks to a specific portion of the page and floats (move) with the up and down scrolling of the page.

At this post I will show you how to make a sticky widget on blogger ( this is just an example, to put on any site can be done with this method, javascript and css included)

1. Get The Widget ID.

    every blogger widget have a specific id. To get this you can go to blogger dashboard then edit a gadget to make it sticky.


2. Add Style

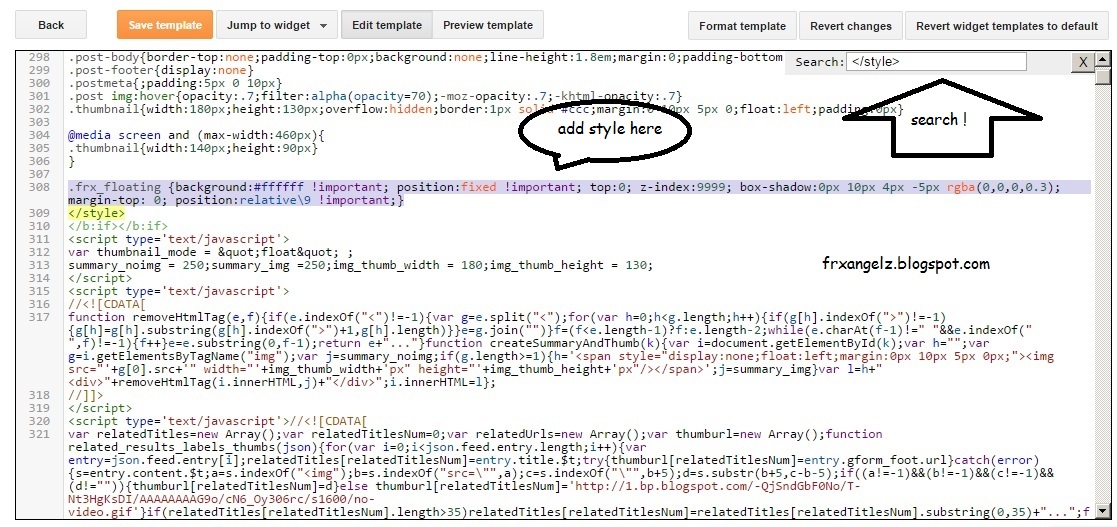
search for </style> add this style :
.frx_floating {background:#ffffff !important; position:fixed !important; top:0; z-index:9999; box-shadow:0px 10px 4px -5px rgba(0,0,0,0.3); margin-top: 0; position:relative\9 !important;}

3. Add this Script :

<script type='text/javascript'>
//<![CDATA[
function frx_make_sticky(element_id) {
    var v_sticky = document.getElementById(element_id);
    var v_scroll = document.createElement("div");
    v_sticky.parentNode.insertBefore(v_scroll, v_sticky);
    var width = v_sticky.offsetWidth;
    var v_Class = v_sticky.className + ' v_sticky';
    window.addEventListener('scroll', v_floating, false);
    function v_floating() {
        var rect = v_scroll.getBoundingClientRect();
        if (rect.top < 0) {
            v_sticky.className = v_Class + ' frx_floating';
            v_sticky.style.width = width + "px";
        } else {
            v_sticky.className = v_Class;
        }
    }
}
//]]>
</script>

4. Go to end of body, search for </body>
call the script :
frx_make_sticky("HTML3");

where "HTML3" is widget ID (replace it with yours)


5. Save Template. 

goto your blogger site and reload/refresh.

here is the video tutorial :

add random youtube video to your web or blogger

watch on youtube

first of all, you must write javascript code like this :


function randomRange(l,h){  var range = (h-l);  var random = Math.floor(Math.random()*range);  if (random === 0){random+=1;}  return l+random;}
function get_random_yid(){        var ids = document.getElementsByClassName("youtube-id");    var idx = randomRange(ids.length,0);    return ids[idx].getAttribute("id");}
function frx_ytb_show(autoPlay){        var videos = document.getElementsByClassName("youtube-frame");      for (var i=0; i<videos.length; i++) {          var youtube = videos[i];          var yid = get_random_yid();        youtube.setAttribute("id", yid);        youtube.style["position"]="relative";          if(autoPlay)           youtube.setAttribute("src",           "https://www.youtube.com/embed/" + youtube.id            + "?autoplay=1&autohide=1&border=0&wmode=opaque&enablejsapi=1");            else            youtube.setAttribute("src",                "https://www.youtube.com/embed/" + youtube.id                 + "?autohide=1&border=0&wmode=opaque");     }}
copy and save to file, or you can download here : 

go to your blogger dashboard or you site html, then add the script:
i use blogger for this example.

1. edit html

2. add script

3. Search </body> 

4. call the script before </body>
set parameter 1 will make script to play youtube video automatically.


5. Add your video-id list (multiple video id)
at this example i use a gadget to put video list.

i also put youtube frame here ( you may put at any places on your web/blogger) 


you can put another youtube frame (viewer) (multiple youtube frame)